
|

|

|
Austin Mini 1000 1971 restoration |
|||
|
This was originally intended to be my daughter´s first car.
My plan was to have it Read the descriptions and click the picture at the side to see more. |
|||
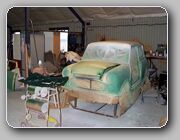
Bodywork and paint. |
Since restoration started before the "digital era"
i have no pictures to show the body repairs. This page starts after the body had been repaired
and sandblasted. It will show You the initial paintwork. |
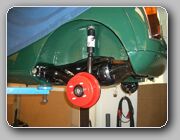
Brakes and Suspension. |
After painting I started with the subframes and brakes. Every part previously painted was sandblasted and powdercoated with primer and then a black finish. Every worn part was replaced with a new one and all the small hardware was replated with zink. New shocks were installed, and all the braking parts were of course replaced as well. |
General assembly. |
Next up was installation of various bits and pieces on the car. |
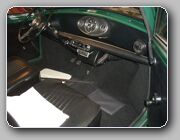
Interior |
The interior was not too bad to start with. But nevertheless I installed a new headlining with felt-backing, and a new set of carpets. The seats, belts and door-cards were restored. The rubber around the windows and doors were replaced with new items. 3 of the windows were somewhat scratched so they were also replaced. Naturally, the instrument and heater were overhauled as well. |
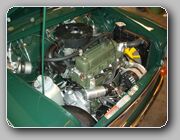
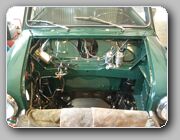
Engine and gearbox. |
The car only had 65000 km on the clock, so the engine and gearbox were in
very good condition. But the old valves and head were not suited for the unleaded petrol of today, so it
had to be a complete overhaul on these as well. Why not, it´s only money... And it´s no fun
installing an old engine in an otherwise "new" car... |
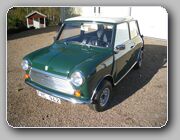
The finale. |
10 years into this restoration, things are beginning to look like a car again.
This page will show the final result. Some 500 hours of work and A LOT of cash has gone into this project. It has been fun to do, and I hope it will give some enthusiast a lot of pleasure for a long time. Yes, it´s for sale(!), my hobby is to restore, not to collect cars. It hasn´t been driven after restoration so consider this a 38 year old - new car! If You are interested, please contact me here . Thanks for looking! |